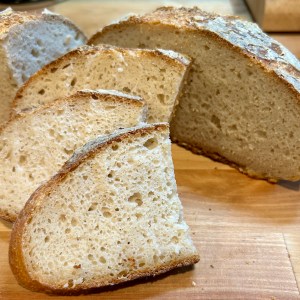
Simple 1:1 Flour Blend Gluten-Free Sourdough Loaf
This simple 1:1 flour gluten-free sourdough loaf is the gateway to bread creativity. If you don't want to keep various flours on hand or just want to shorten the measuring steps, this 1:1 flour recipes lets you still have the delicious flavor of gluten-free sourdough without the hassle of multiple flours. The texture of this bread is superb and you can tailor the flavor to your liking!
Equipment
- 2 Large Glass Bowls
- Stand Mixer - You can mix by hand if you wish.
- Banneton Basket
- Dutch Oven
- Small Bowl for weighing psyllium husk
Ingredients
- 290 g water warm
- 15 g whole psyllium husk or 12g psyllium husk powder
- 280 g 1:1 gluten-free flour I have tested this recipe with both Pamela's brand & Bob's Red Mill brand - make sure your blend contains xanthan gum
- 180 g sourdough starter all my recipes are tested with a brown rice starter
- 20 g maple syrup
- 10 g salt
- 6 g baking powder or 12g apple cider vinegar For a taller, more firm, mild-tasting loaf, use baking powder. For a softer, more sour-tasting loaf, use apple cider vinegar.
- oil for shaping
- 2 tbsp white rice for baking
Instructions
- Whisk psyllium husk into the warm water and let sit for a few minutes for a gel to form.
- In a separate bowl, mix together the other dry ingredients - flour, baking powder (if using) and salt.
- Into the psyllium husk gel, whisk the starter and maple syrup.
- Pour the gel mixture into the dry ingredients. Mix with an electric mixer on medium to high speed for approximately 5 minutes. Continue mixing until a very smooth dough has formed.
- Using a spatula, scrape down the edges of the bowl and form dough into a ball/pile in the bowl.
- Turn dough out of the bowl onto a lightly oiled surface (I use avocado oil). Lightly oil your hands and press the dough flat.
- Fold the dough in half and form into a ball shape.
- Pinch your seams together & place your dough ball seam-side down into a bowl.
- Cover the bowl with plastic wrap or a damp towel. Let the dough proof until it has nearly doubled. It should increase 70-90% in size.
- Once your dough has nearly doubled in size, turn your dough onto a lightly floured surface. Press your dough ball out.
- Fold the dough in half and form it into a ball.
- Pinch the seams together and place the dough seam-side up in a lightly floured Banneton basket.
- Cover with greased plastic wrap or a damp towel. I prefer greased plastic wrap.
- Let the dough rise until it has nearly doubled (increasing 70-90% in size).
- Preheat oven with Dutch oven inside to 475°F about 45 minutes before you want to bake your bread.
- Remove Dutch oven from the oven & sprinkle rice in the bottom of the pan.
- Using parchment paper, transfer your loaf from the Banneton basket to the Dutch oven. I prefer one clean transfer. It's better than setting my dough on parchment paper on the counter to score.
- Score your loaf using a bread lame or sharp knife.
- Cover and place your Dutch oven in the oven. Bake for 20 minutes.
- Remove the cover. Drop the temperature to 450°F. Bake for another 35-40 minutes, or until the loaf is dark brown but not burnt on top. This will ensure your center is cooked and not gummy.
- Remove from Dutch oven and let cool completely before cutting. Your bread will keep cooking as it cools. If you cut too early, your bread will likely be gummy.
- Store on the counter for 2-3 days or slice and freeze.
Your dough should look puffy and expanded on top. If it looks like it is spreading out, it is almost like it is melting. These would be signs your dough is over-proofed.